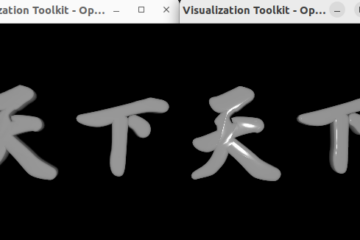
The post demonstrates the process of configuring the 3D window after switching from the original canvas to another.
After clicking on the update button at the bottom-left position on the webpage, we will call Worker::ChangeRenderWindow to handle the scene.
index.html:
<html>
   <head>
      <!-- Load WebAssembly module -->
      <script type="text/javascript" src="changeCanvasForWASM.js"></script>
   </head>
   <body>
      <canvas id="canvas" style="position: absolute; left: 0; top: 0; width:500px; height:500px"></canvas>
      <canvas id="canvas1" style="position: absolute; right: 0; top: 0; width:500px; height:500px"></canvas>

      <button id="button" style="position: absolute; left: 0; bottom: 0;"> update </button>

      <script>
        function $(id){ return document.getElementById(id); }

        var workerObj = null;
        var Module = {
         canvas: (function () {
           var canvas = document.getElementById('canvas');
           canvas.addEventListener(
             "webglcontextlost",
             function (e) {
               console.error('WebGL context lost. You will need to reload the page.');
               e.preventDefault();
             },
             false
           );
           return canvas;
         })(),
         onRuntimeInitialized: function () {
            workerObj = new Module.Worker();
            workerObj.Init();
            workerObj.Start();
            console.log( "StartWork!" );
         },
         };

        var app = tester(Module);
        console.log('App created');

        // change left and right canvases.
        $('button').onclick = function()
        {
          workerObj.Terminate();

          $('canvas').hidden="hidden";
          $('canvas').id = "canvas2";
          $('canvas1').id = "canvas";
          Module.canvas = $('canvas');
          $('canvas2').id = "canvas1";

          workerObj.ChangeRenderWindow();
          console.log( "StartWork!" );
        }
      </script>
   </body>
</html>
The interface in worker.cpp:
/**
 * @brief   the interface is used in web page
 *
 * @return  nothing
 */
void Worker::ChangeRenderWindow()
{
    //m_RenderWindowInteractor->TerminateApp();

    std::cout << "m_Renderer: " << m_Renderer << std::endl;
    std::cout << "m_RenderWindowInteractor: " << m_RenderWindowInteractor << std::endl;

    m_Renderer = vtkSPtr<vtkRenderer>::New(); // need it!
    m_Renderer->AddActor(m_Actor);
    m_Renderer->SetBackground( 0, 0, 0 );

    m_RenderWindow = vtkSPtr<vtkSDL2OpenGLRenderWindow>::New(); // need
    m_RenderWindow->AddRenderer( m_Renderer );
    //m_RenderWindowInteractor = vtkSPtr<vtkSDL2RenderWindowInteractor>::New();
    m_RenderWindowInteractor->SetRenderWindow( m_RenderWindow );

    m_Renderer->ResetCamera();
    m_RenderWindow->Render();
    m_RenderWindowInteractor->Start();
}
The whole project had been uploaded to GitHub:
https://github.com/theArcticOcean/tutorials/tree/main/learnWebAssembly/changeCanvasForWASM
Result:
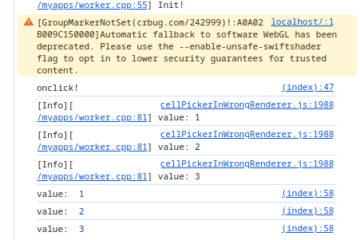
[…] and renderer is neccessary if we don’t restart all data loading.The related post is Change Canvas For VTK WASM Project. I got the following error info on the web page if […]
[…] The related post: https://www.weiy.city/2023/11/change-canvas-for-vtk-wasm-project/ […]
[…] I found an interesting issue about vtkSDL2OpenGLRenderWindow::SetSize when changed canvas for VTK WASM 3D window.The related post on the website is Change Canvas For VTK WASM Project. […]